

Elden Ring Combat Guide
On this page
A guard counter turns a blocked hit into a heavy counterattack. It can help break an enemy’s stance, but you still need an opening to land it and a separate light attack to take the critical hit. Start with a right-hand sword and a left-hand shield while you learn the sequence.
Know the inputs
These are the default PlayStation and Xbox controls for combat on foot. On PC or with remapped controls, use the named actions in your control settings. Controller Settings is under Menu > System.
| Action | PlayStation | Xbox |
|---|---|---|
| Guard | Hold L1 | Hold LB |
| Light attack | R1 | RB |
| Heavy attack | R2 | RT |
| Charged heavy | Hold R2 | Hold RT |
| Jump | Cross | A |
| Roll | Move + Circle | Move + B |
| Two-hand your right-hand weapon | Hold Triangle + press R1 | Hold Y + press RB |
Guard counters use the heavy-attack button immediately after a block. A jumping heavy uses Jump, then Heavy Attack while airborne. Parry uses L2/LT with suitable parrying equipment and must meet an incoming attack; pressing the guard-counter input does not perform a parry.
Keep stamina for the next hit
Attacking, rolling and taking hits on your guard spend stamina in combat. If it empties, you cannot perform another stamina-consuming action until some returns. Stop attacking and give it time to refill. Practise landing one attack in an opening, then defending again before adding a longer combo.
Check the load label beneath your equipment-weight total. Keep your equipped weight below 70% of maximum for a light or medium roll; light load requires below 30%. Heavy rolls recover more slowly. If the menu says Heavy Load, remove an unused equipped weapon or choose lighter armour, then check the label again. Items merely carried in your inventory do not need to be discarded.
Press dodge deliberately. Repeated button presses can queue another roll, and starting a heavy attack commits you to its animation before you can dodge again.
Block with a shield or a weapon
Equip a shield in your left hand, face the attack and hold L1/LB. You can also guard with a two-handed weapon: switch your right-hand weapon to two hands, then hold L1/LB. A shield is not required for the counter.
Read Guarded Damage Negation and Guard Boost on the blocking equipment. Negation tells you how much of each damage type it stops; higher Guard Boost reduces the stamina lost to a comparable blocked hit. Physical protection does not mean equal protection from fire, magic or other damage types. Many grabs also bypass guarding, so move away or dodge when you recognise one.
If a block drains your remaining stamina and breaks your guard, you are exposed. Do not keep accepting hits just because you are holding the button.
Turn the block into a guard counter
- Pick a single enemy and face it with enough stamina to block.
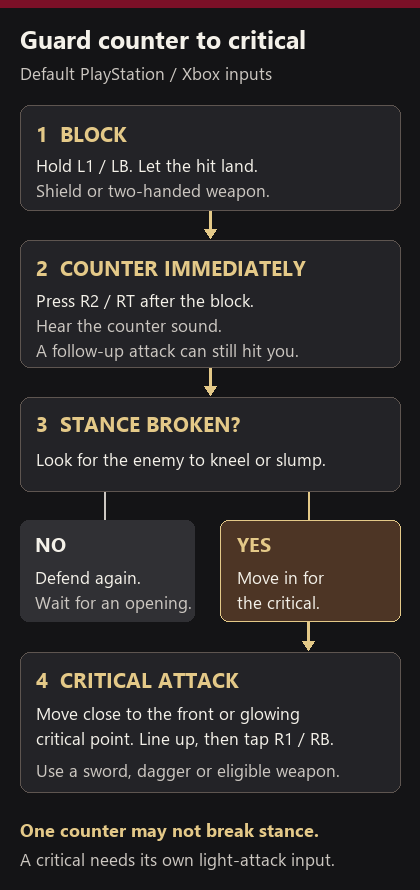
- Let its attack hit your guard. Immediately press R2/RT to counter with your right-hand melee weapon.
- Listen for the distinctive counter sound and watch for the counterattack animation. An ordinary heavy swing means you have not triggered the counter.
- Watch what the enemy does next. If it stays active, defend again; one counter is not a guaranteed stance break.
Choose a hit at the end of an attack sequence when you can. If more swings are coming, keep defending and counter after a later block with a clear opening. The enemy can hit you during your counterattack.
Break stance, then take the critical
Enemy stance determines when enough stance damage will leave a foe temporarily helpless. A brief flinch from an ordinary hit is not the same opening. Guard counters, charged heavy attacks and jumping heavy attacks are useful ways to work toward a stance break.
For a charged heavy, hold R2/RT when the enemy’s recovery gives you time. For a jumping heavy, press Cross/A, then R2/RT while airborne. These attacks can help break stance without blocking first. Choose an opening that lets the attack land; forcing a charge while an enemy is already swinging can get you hit.
When the enemy drops to its knees or slumps into a stance break, move close to its front. On larger enemies, look for the glowing critical point and approach that spot. Line yourself up, stop moving and tap R1/RB once. The critical has its own attack animation; an ordinary swing means it did not connect as a critical.
If that happens, check your position and whether the enemy is still exposed. Use a weapon that can perform critical attacks, such as a sword or dagger. Whips, bows, staves and sacred seals cannot deliver them. If the opening ends before you reach the right spot, resume defending instead of chasing another input into the enemy’s next attack.