
Minecraft Nether Guide: Build a Portal and Get Home
On this page
For unmodded Java and Bedrock Survival with default rules. Make your first Nether trip a short return journey: build the portal, secure its arrival area, then come home. A successful return gives you a base for later exploration.
Prepare an Overworld base and a travel kit
Use a bed in a safe Overworld shelter and confirm Respawn point set. Keep the bed accessible and leave a spare pickaxe, food and building blocks at home. Record the coordinates of both your shelter and the portal you are about to build.
| Bring | Purpose |
|---|---|
| Food and serviceable armour | Support a short trip and give you a better chance in an unexpected fight |
| A pickaxe | Clear a route or gather blocks |
| Spare blocks, such as cobblestone | Protect the arrival area and mark the way back |
| Flint and steel with durability remaining | Light the portal and relight it if the purple opening disappears |
| One worn gold armour piece | Prevent ordinary unprovoked piglin targeting |
Golden boots are a useful gold piece: arrange four gold ingots as two vertical pairs, with an empty column between them. Use gold ingots you have gathered before travelling. The remaining armour slots can hold stronger equipment.
Gold is limited protection. Regular piglins can still become angry if you open containers or break gold-related blocks nearby. Piglin brutes attack regardless of clothing. Leave bastion raids for a later trip, and remember that gold armour does not protect you from lava.
Collect ten ordinary obsidian blocks
For this straightforward route, first make a diamond pickaxe from three diamonds across the top row and two sticks down the centre. A diamond or netherite pickaxe can collect ordinary obsidian; an iron pickaxe cannot.
In the Overworld, find a lava pool you can approach from solid ground. Bring water in a bucket. If you need a bucket, craft one with three iron ingots in a V shape, then fill it from water.
Place the water so it flows over lava source blocks, turning them into obsidian. Flowing lava is different and will not give you the same result. Work from a stable edge, mine the obsidian with your diamond pickaxe and collect ten blocks. Keep water covering the work area where practical, and check beneath each mined block: more lava may remain below. Do not stand on the block you are mining.
Obsidian from a ruined portal or its nearby chest can reduce how much you need to collect. Inspect a ruined frame before trying to use it. Crying obsidian cannot replace one of the required ordinary obsidian blocks.
Build the minimum portal frame
The completed outline is four blocks wide and five blocks high, with an empty opening two blocks wide and three high. The four corners are optional, so the required frame uses ten obsidian.
- Place two obsidian blocks side by side for the bottom of the opening.
- Leave or fill the corner spaces just outside them; temporary building blocks can help you place the sides.
- Build a three-obsidian-high column on each side of the opening.
- Join the top with two more obsidian blocks, directly above the bottom pair.
- Clear all blocks from the two-by-three interior.
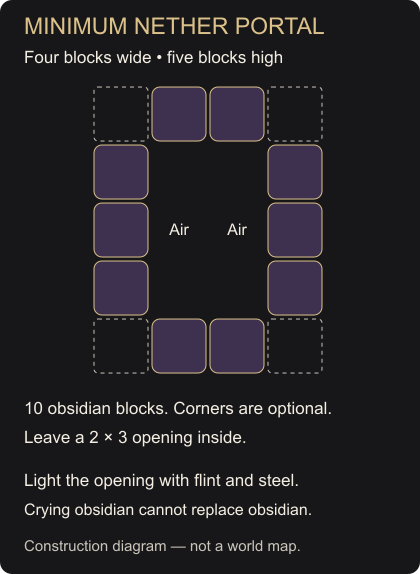
Use the portal diagram to check the outline before spending more obsidian. A solid wall of obsidian is not a portal frame; the centre must remain open.
Make flint and steel, then enter
Dig gravel until it drops flint. Not every block drops it, so keep trying if you only collect gravel. Combine one flint and one iron ingot anywhere in a crafting grid to make flint and steel.
Use the flint and steel on the top face of one of the bottom obsidian blocks, inside the opening. The interior should become purple. If it does not, check the frame’s size, the ordinary obsidian along every required edge, and the clear interior.
Keep the flint and steel with you. Stand in the purple opening until you travel to the Nether.
Secure the arrival and test the return
Pause your movement when you arrive and inspect the ground. Look for exposed lava, drops and nearby mobs before stepping away. If the arrival is immediately dangerous, step out of the portal and back into it to return and prepare more supplies.
Record the actual Nether portal coordinates. In Bedrock, enable Show Coordinates under Settings → Game. In Java, use F3; F3 + F6 opens Debug Options if position information is hidden.
Use your blocks to make a small protected arrival area with a clear doorway. Keep the portal accessible. Mark that doorway and any short path you take so the return route remains obvious. Avoid extending a long bridge across open lava on this first visit.
To return, step out of the arrival portal and then back into its purple opening. Wait inside until you travel. Check where you emerge and record the actual return portal before leaving it.
Handle the common failures
The purple opening vanished: if the obsidian frame is intact, relight it with your flint and steel. If a required frame block is missing, repair that block first. Keep the tool somewhere easy to select.
You need to rest or put out fire: ordinary beds explode when used in the Nether under default rules. Placed water also evaporates there, so your water bucket cannot provide an open-water escape. Keep away from lava and return to the Overworld to recover.
You died: a usable Overworld bed remains your respawn point. Take the backup kit and use the portal to retrace your short route. Dropped items can disappear after five minutes while the area is loaded; lava may destroy them before you can return.
Once you have come home and checked the return location, restock your food and blocks. The portal is now a starting point for another short, marked expedition.
Keep going
Independent fan guide. Not an official Minecraft product; not approved by or associated with Mojang or Microsoft.
Further recipe and block references: Minecraft Wiki: Obsidian, Mojang: pinned vanilla recipe data.